Скачать с ютуб iPhone 16 Pro Max Camera Control & Power Button Repair Tutorial в хорошем качестве
iPhone 16 Pro Max Camera Control & Power Button Repair Tutorial
3 месяца назад
iphone 16 pro max power button replacement
iphone 16 pro max button replacement
howfixit
iphone 16 pro max power button
iphone 16 pro max power button not working
iphone 16 pro max sticky power button
iphone 16 pro max power button stuck
iphone 16 pro max power button repair
iphone 16 pro max power button fix
iphone 16 pro max change power button
iphone 16 pro max camera button replacement
iphone 16 pro max camera control button
iphone 16 pro max camera button repair
Из-за периодической блокировки нашего сайта РКН сервисами, просим воспользоваться резервным адресом:
Загрузить через dTub.ru Загрузить через ClipSaver.ruСкачать бесплатно iPhone 16 Pro Max Camera Control & Power Button Repair Tutorial в качестве 4к (2к / 1080p)
У нас вы можете посмотреть бесплатно iPhone 16 Pro Max Camera Control & Power Button Repair Tutorial или скачать в максимальном доступном качестве, которое было загружено на ютуб. Для скачивания выберите вариант из формы ниже:
Загрузить музыку / рингтон iPhone 16 Pro Max Camera Control & Power Button Repair Tutorial в формате MP3:
Роботам не доступно скачивание файлов. Если вы считаете что это ошибочное сообщение - попробуйте зайти на сайт через браузер google chrome или mozilla firefox. Если сообщение не исчезает - напишите о проблеме в обратную связь. Спасибо.
Если кнопки скачивания не
загрузились
НАЖМИТЕ ЗДЕСЬ или обновите страницу
Если возникают проблемы со скачиванием, пожалуйста напишите в поддержку по адресу внизу
страницы.
Спасибо за использование сервиса savevideohd.ru
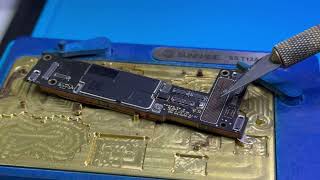
iPhone 16 Pro Max Camera Control & Power Button Repair Tutorial
Fix your iPhone 16 Pro Max power or camera control button with our detailed DIY repair guide—easy, step-by-step, and hassle-free! Buy tools and parts on AMAZON: Screwdriver Set: https://hfixt.com/mpro Pro Toolkit: https://hfixt.com/tool Magnetic Mat: https://hfixt.com/mat Tweezers: https://hfixt.com/tzrs Global AliExpress: Screwdriver Set: https://hfixt.com/alis Opening Tool Kit: https://hfixt.com/alit Magnetic Mat: https://hfixt.com/amat Tweezers set: https://hfixt.com/altz Adhesive Tape: https://hfixt.com/ip16a Power Button Cable: https://s.click.aliexpress.com/e/_oBr... 📌*Useful links* More DIY repair guides: https://how-fixit.com 📱Follow us for more tech tips and guides! Instagram: / howfixit Facebook: / howfixit X: https://x.com/HowFixit Description Learn How to Fix iPhone 16 Pro Max Power and Camera Buttons. If the power or camera control buttons on your iPhone 16 Pro Max are stuck, broken, or unresponsive, this comprehensive step-by-step guide will help you fix them at home. Follow along as we demonstrate how to safely disassemble, replace, and reassemble the components while restoring your iPhone’s functionality. 🔧*Tools Required* Screwdrivers: Pentalobe 0.8 mm, Tri-Wing 0.8 mm, Phillips 1 mm, Standoff 1.5 mm Plastic pry tools, suction cup, screen disassembly tool Magnetic mat, waterproof adhesive tape, battery adhesive strips What You'll Learn Proper techniques for disassembling and reassembling the iPhone 16 Pro Max. Replacing the button flex cable for functional buttons. Restoring water resistance and ensuring reliable reassembly. Whether you’re a repair novice or a pro, our guide ensures a smooth, efficient process. Links to all necessary tools and parts are available in the description. Don’t forget to test all functions after reassembly and restore water resistance for a fully functional device. If you find this video helpful, like, subscribe, and visit HowFixit for more DIY tech solutions. 🎬Time Code: 00:00 Introduction to Button Repair 00:19 Tools Required for the Repair 01:00 iPhone Disassembly Begins 01:31 Removing the Back Glass 03:45 Disconnecting the Battery and Components 06:38 Removing the ear speaker and Face ID module 07:29 Removing the Camera and Logic Board 10:35 Accessing and Replacing Button Flex Cable 12:52 Installing the New Battery and Reassembly 20:29 Test new button 21:00 Restoring Water Resistance 28:11 Final Testing and Wrap-Up 🌟FAQ: Question 1: Can I replace iPhone buttons without professional tools? Answer: Professional tools are highly recommended for safety and efficiency. Question 2: Will replacing the buttons void my iPhone warranty? Answer: Yes, opening your device may void the warranty. Question 3: Can I reuse the old adhesive for water resistance? Answer: No, you should always replace adhesive for proper sealing. Question 4: How do I fix the Camera Control Button’s sensor? Answer: The sensor is tied to the housing; replacing the housing may be required. Question 5: Where can I buy replacement parts? Answer: Links to all tools and parts are provided in the video description. AFFILIATE PROGRAM We are a participant in the Amazon Services LLC Associates Program, an affiliate advertising program designed to provide a means for us to earn fees by linking to Amazon.com and affiliated sites. #iphone16promax #iphonerepair #diyrepair #howfixit #iphonetutorial
Comments