–°–∫–∞—á–∞—Ç—å —Å —é—Ç—É–± Crystal Bag Tutorial | How to Make A Crystal Clutch Handbag with A Metal Frame | Girlglow Kit 1 –≤ —Ö–æ—Ä–æ—à–µ–º –∫–∞—á–µ—Å—Ç–≤–µ
Crystal Bag Tutorial | How to Make A Crystal Clutch Handbag with A Metal Frame | Girlglow Kit 1
5 –º–µ—Å—è—Ü–µ–≤ –Ω–∞–∑–∞–¥
–ò–∑-–∑–∞ –ø–µ—Ä–∏–æ–¥–∏—á–µ—Å–∫–æ–π –±–ª–æ–∫–∏—Ä–æ–≤–∫–∏ –Ω–∞—à–µ–≥–æ —Å–∞–π—Ç–∞ –Ý–ö–ù —Å–µ—Ä–≤–∏—Å–∞–º–∏, –ø—Ä–æ—Å–∏–º –≤–æ—Å–ø–æ–ª—å–∑–æ–≤–∞—Ç—å—Å—è —Ä–µ–∑–µ—Ä–≤–Ω—ã–º –∞–¥—Ä–µ—Å–æ–º:
–ó–∞–≥—Ä—É–∑–∏—Ç—å —á–µ—Ä–µ–∑ ClipSaver.ru–°–∫–∞—á–∞—Ç—å –±–µ—Å–ø–ª–∞—Ç–Ω–æ Crystal Bag Tutorial | How to Make A Crystal Clutch Handbag with A Metal Frame | Girlglow Kit 1 –≤ –∫–∞—á–µ—Å—Ç–≤–µ 4–∫ (2–∫ / 1080p)
–£ –Ω–∞—Å –≤—ã –º–æ–∂–µ—Ç–µ –ø–æ—Å–º–æ—Ç—Ä–µ—Ç—å –±–µ—Å–ø–ª–∞—Ç–Ω–æ Crystal Bag Tutorial | How to Make A Crystal Clutch Handbag with A Metal Frame | Girlglow Kit 1 –∏–ª–∏ —Å–∫–∞—á–∞—Ç—å –≤ –º–∞–∫—Å–∏–º–∞–ª—å–Ω–æ–º –¥–æ—Å—Ç—É–ø–Ω–æ–º –∫–∞—á–µ—Å—Ç–≤–µ, –∫–æ—Ç–æ—Ä–æ–µ –±—ã–ª–æ –∑–∞–≥—Ä—É–∂–µ–Ω–æ –Ω–∞ —é—Ç—É–±. –î–ª—è —Å–∫–∞—á–∏–≤–∞–Ω–∏—è –≤—ã–±–µ—Ä–∏—Ç–µ –≤–∞—Ä–∏–∞–Ω—Ç –∏–∑ —Ñ–æ—Ä–º—ã –Ω–∏–∂–µ:
–ó–∞–≥—Ä—É–∑–∏—Ç—å –º—É–∑—ã–∫—É / —Ä–∏–Ω–≥—Ç–æ–Ω Crystal Bag Tutorial | How to Make A Crystal Clutch Handbag with A Metal Frame | Girlglow Kit 1 –≤ —Ñ–æ—Ä–º–∞—Ç–µ MP3:
–Ý–æ–±–æ—Ç–∞–º –Ω–µ –¥–æ—Å—Ç—É–ø–Ω–æ —Å–∫–∞—á–∏–≤–∞–Ω–∏–µ —Ñ–∞–π–ª–æ–≤. –ï—Å–ª–∏ –≤—ã —Å—á–∏—Ç–∞–µ—Ç–µ —á—Ç–æ —ç—Ç–æ –æ—à–∏–±–æ—á–Ω–æ–µ —Å–æ–æ–±—â–µ–Ω–∏–µ - –ø–æ–ø—Ä–æ–±—É–π—Ç–µ –∑–∞–π—Ç–∏ –Ω–∞ —Å–∞–π—Ç —á–µ—Ä–µ–∑ –±—Ä–∞—É–∑–µ—Ä google chrome –∏–ª–∏ mozilla firefox. –ï—Å–ª–∏ —Å–æ–æ–±—â–µ–Ω–∏–µ –Ω–µ –∏—Å—á–µ–∑–∞–µ—Ç - –Ω–∞–ø–∏—à–∏—Ç–µ –æ –ø—Ä–æ–±–ª–µ–º–µ –≤ –æ–±—Ä–∞—Ç–Ω—É—é —Å–≤—è–∑—å. –°–ø–∞—Å–∏–±–æ.
–ï—Å–ª–∏ –∫–Ω–æ–ø–∫–∏ —Å–∫–∞—á–∏–≤–∞–Ω–∏—è –Ω–µ
–∑–∞–≥—Ä—É–∑–∏–ª–∏—Å—å
–ù–ê–ñ–ú–ò–¢–ï –ó–î–ï–°–¨ –∏–ª–∏ –æ–±–Ω–æ–≤–∏—Ç–µ —Å—Ç—Ä–∞–Ω–∏—Ü—É
–ï—Å–ª–∏ –≤–æ–∑–Ω–∏–∫–∞—é—Ç –ø—Ä–æ–±–ª–µ–º—ã —Å–æ —Å–∫–∞—á–∏–≤–∞–Ω–∏–µ–º, –ø–æ–∂–∞–ª—É–π—Å—Ç–∞ –Ω–∞–ø–∏—à–∏—Ç–µ –≤ –ø–æ–¥–¥–µ—Ä–∂–∫—É –ø–æ –∞–¥—Ä–µ—Å—É –≤–Ω–∏–∑—É
—Å—Ç—Ä–∞–Ω–∏—Ü—ã.
–°–ø–∞—Å–∏–±–æ –∑–∞ –∏—Å–ø–æ–ª—å–∑–æ–≤–∞–Ω–∏–µ —Å–µ—Ä–≤–∏—Å–∞ savevideohd.ru
Crystal Bag Tutorial | How to Make A Crystal Clutch Handbag with A Metal Frame | Girlglow Kit 1
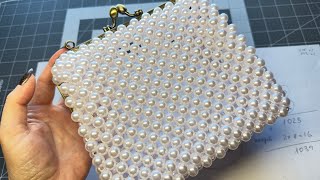
Here’s a step-by-step guide to create this stunning crystal beaded bag. If you run into any issues along the way, drop your questions in the comments, and I’ll be there to help! If you find this video useful and still haven’t subscribed to this channel, go ahead and hit that subscribe button, like, and share this video. I’ve got plenty more DIY bag tutorials coming your way. Materials I have used: Beads: 6*8mm faceted crystals. In this video, I have used about 2,400 beads totally. Fishing Line: 0.5mm (Don’t use stretch beading line) Kiss Lock Frame: 20cm with 53 holes on each size O ring: 2.5cm inner width If you don't want to bother looking for these materials separately, you can directly visit this kit link to purchase the complete kit and select your color from 40+. Here you separately choose your beads color and your accessories color, so you can pick and get your favorite match. Whole Kit Link: https://girlglowdiy.com/collections/c... Beads Link: https://girlglowdiy.com/collections/b... All materials are availalbe on this website: https://girlglowdiy.com Part 1: What do we need:(00:26-00:55) Part 2-How to Make the Body 2-1: bead with metal(01:00-7:38) 2-2: add new line/thread(8:00-12:00) 2-3: Attach the two panel together(12:20-15:00) Part 3: How to make the bottom 3-1: start the Bottom (15:10-16:17) 3-2: Make the first Corner (16:18-16:40) The Second Corner(17:20-17:56) 3-3: Finish the Bottom(19:05-21:08) Part 4: How to Make the Beaded Handle(21:17-28:50) Thanks for watching!
Comments