Скачать с ютуб Building R2-D2 - Part 5: Body Assembly including dome drive. в хорошем качестве
Building R2-D2 - Part 5: Body Assembly including dome drive.
3 года назад
building r2-d2
making r2-d2 part 5
making r2d2
how to make r2d2
make your own r2-d2
amke your own r2-d2
Build your own r2-d2
john salt
r2-d2
mr. baddeley r2d2
3d printed r2d2 dome
r2d2
diy r2d2
make r2d2
diy life size r2d2
full size rc r2d2
make your own r2d2
building r2d2
building r2d2 part 5
mr baddeley r2d2
mark 3 r2d2
mark iii r2d2
r2d2 dome driver
making r2d2 robot
diy r2d2 droid
mk3 r2d2
build your own r2d2
how to build r2d2
Из-за периодической блокировки нашего сайта РКН сервисами, просим воспользоваться резервным адресом:
Загрузить через dTub.ru Загрузить через ClipSaver.ruСкачать бесплатно Building R2-D2 - Part 5: Body Assembly including dome drive. в качестве 4к (2к / 1080p)
У нас вы можете посмотреть бесплатно Building R2-D2 - Part 5: Body Assembly including dome drive. или скачать в максимальном доступном качестве, которое было загружено на ютуб. Для скачивания выберите вариант из формы ниже:
Загрузить музыку / рингтон Building R2-D2 - Part 5: Body Assembly including dome drive. в формате MP3:
Роботам не доступно скачивание файлов. Если вы считаете что это ошибочное сообщение - попробуйте зайти на сайт через браузер google chrome или mozilla firefox. Если сообщение не исчезает - напишите о проблеме в обратную связь. Спасибо.
Если кнопки скачивания не
загрузились
НАЖМИТЕ ЗДЕСЬ или обновите страницу
Если возникают проблемы со скачиванием, пожалуйста напишите в поддержку по адресу внизу
страницы.
Спасибо за использование сервиса savevideohd.ru
Building R2-D2 - Part 5: Body Assembly including dome drive.
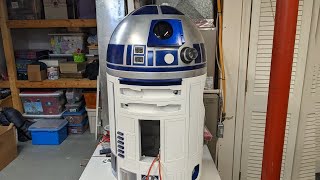
Welcome to Part 5 of my Building R2-D2 series. Today we are building the main body, fitting the utility arms and getting the dome drive working. I'll give a few tips along the way that will hopefully save you from making some of the mistakes I've made (so far). I'm using the Mr. Baddeley MK 3 cut version files for the body. My little Sovol SV01 with a build plate size of 280x240 was just large enough for some of these larger body files which are the biggest in this entire project. A few used up the full diagonal space on the build plate and almost all the gantry height of this printer. (300mm). Video Chapters: 0:00 Intro 0:19 Printed R2-D2 main body parts overview 2:47 Gluing the body together 5:15 Sanding R2's body 5:50 MK 3 threaded body rods 8:38 R2D2 body greebles overview 9:57 Fitting the utility arms 13:53 Fitting upper ring & drive motor 16:59 Fitting dome ring gear & lazy susan 19:09 Dome drive working 21:50 Conclusion Links: 37mm 24Vdc 300 RPM high torque motor I used for the dome drive: https://amzn.to/3A2O6fo SyRen 10A dome motor controller I'm using: https://amzn.to/3FAVKPk 2A 12 Conductor Slip Ring: https://amzn.to/3fwAY8P Crepe Natural Rubber sandpaper cleaning block: https://amzn.to/3tBRcG2 3D Printer used in this R2-D2 build - Sovol SV01: https://amzn.to/3dk9C4U Making R2-D2 Video Series: Introduction to a DIY R2-D2 Build: • R2-D2 Build Your Own - Getting starte... Part 1 Making the dome: • Make Your Own R2-D2 - Part 1. Dome pr... Part 2 Painting the dome: • Painting R2-D2 - Dome Colors, Priming... Part 3 Dome lights & holoprojectors: • R2-D2 Dome Lights - Teeces Kit, Diffu... Part 4 Dome Completion: • Making R2-D2 Part 4 - Final Dome Asse... Part 5 Mark 3 Body Assembly: • Building R2-D2 - Part 5: Body Assembl... Part 6 R2 Sound System Basics: • R2-D2 Sound System - Easy RC control ... Part 7 R2 Electronic Basics: • The Basics of R2-D2 Electronics for t... Part 8 R2 Legs & Foot Drives: • Building R2-D2 Part 8 - First Steps! ... Part 9 Painting R2-D2: • Painting R2-D2 - Plus More Finishing ... Part 10 Installing Electronics: • R2-D2 Build Part 10 - Electronics Ins... Conclusion to a DIY R2-D2 Build: • Making R2-D2 - Finishing Up The R2 Bu... Astromech R2 Builders Club Forum: https://astromech.net/ Mr. Baddeley's Patreon Page (source for Astromech Droid 3D print files, instructions & more): / mrbaddeley Hardware needed for the Baddeley MK3 3D printed R2 body (will obviously vary slightly feature & mounting methods dependent): 4x 5/32nd rod (threaded on ends) or (M4 threaded rod) 500mm long 4x 5/32nd rod (threaded on ends) or (M4 threaded rod) 370mm long 2.5mm steel or brass rod for making the door hinge pins (I just used some plain smooth finishing nails of the correct diameter I had in my nail bin) M2 (2.2mm) self tapping counter sunk screws (for doors/hinges). I used assorted set - lengths from 5mm to 8mm) 12x M6x35mm button head hex bolts for skirt 12x M6 hex nuts 12x M6 washers 4x M4x30 button head hex bolts 8x M4x12 button head hex bolts 20x M4x10 button head hex bolts 30x M4 square nuts 10x M4 hex nuts 3x M4 x30 counter sunk hex bolts for lazy suzan to dome fitment 6x M4x15 hex bolts for attaching lazy suzan to body ring 4x 606 ball bearings for utility arms (your call if want to use RS/sealed, or ZZ cover types) 2x 5mmx5mm magnets for doors if you want magnetic door catch (instructions call for one 5mm and one 3mm. I found the 3mm magnet too weak so used both 5mm (drilled 3mm door magnet hole out larger). magnets of your choice (if any) to secure dome to lazy susan. DISCLAIMER: Links included in this description might be affiliate links. If you purchase a product or service with the links that I provide I may receive a small commission. There is no additional charge to you! Thank you for supporting RC Helicopter Fun.com & my channel which helps me keep creating content & fun projects like this. Please consider giving a thumbs up & subscribe if you enjoy the content - thank you & thanks for watching :)
Comments