Скачать с ютуб Mercedes W123 Differential Restoration в хорошем качестве
Mercedes W123 Differential Restoration
3 года назад
restoration
restore
mercedes
differential restoration
Restore It
differential
2k
paint
spray
gun
300SL roadster
blasting
degreaser
w123
parts
w123 restoration
car
mod
mods
repaint
respray
clean
old
new
it
rusty
remove
refurbished
refurbish
how to
how
guide
learn
fix
BMW e30
engine
audi
mini
vehicle
maintenance
VW
ford
dodge
chevrolet
toyota
Renault
Peugeot
Opel
LSD
Limited
Slip
Diff
final drive
open
closed
locked
welded
drift
lock
ratio
clutch
M Sport
E36
leaking differential
Из-за периодической блокировки нашего сайта РКН сервисами, просим воспользоваться резервным адресом:
Загрузить через dTub.ru Загрузить через ClipSaver.ruСкачать бесплатно Mercedes W123 Differential Restoration в качестве 4к (2к / 1080p)
У нас вы можете посмотреть бесплатно Mercedes W123 Differential Restoration или скачать в максимальном доступном качестве, которое было загружено на ютуб. Для скачивания выберите вариант из формы ниже:
Загрузить музыку / рингтон Mercedes W123 Differential Restoration в формате MP3:
Роботам не доступно скачивание файлов. Если вы считаете что это ошибочное сообщение - попробуйте зайти на сайт через браузер google chrome или mozilla firefox. Если сообщение не исчезает - напишите о проблеме в обратную связь. Спасибо.
Если кнопки скачивания не
загрузились
НАЖМИТЕ ЗДЕСЬ или обновите страницу
Если возникают проблемы со скачиванием, пожалуйста напишите в поддержку по адресу внизу
страницы.
Спасибо за использование сервиса savevideohd.ru
Mercedes W123 Differential Restoration
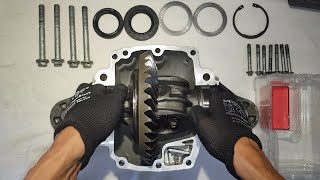
Go to https://getroman.com/RESTORE for $15 dollars off your first order of ED treatment. In this episode of Restore It, we restore and rebuild the differential from the Mercedes W123 2180CE. I noticed it was leaking at the front and rear when I had the car on the lift. I asked the owner if he'd like me to restore it and he of course gave me the go-ahead. This episode documents the entire process. Thanks for watching. Subscribe for more! #restoration #mercedes #differential Timestamps 00:00 – Intro 00:27 - Getroman.com/restore 01:14 - Draining the oil 01:45 - Removing the drain plug 02:02 - Removing the rear case 03:02 - Removing the driveshafts 03:26 - Removing the pinion nut - beginning 03:53 - Removing the side seals 04:11 - Removing the large circlips 04:33 - Removing the side bearing races 04:51 - Removing the differential from the case 05:12 - Removing the side bearings from the differential 05:43 - Removing the pinion nut - end 06:00 - Removing the pinion shaft 06:15 - Removing the drive flange 06:19 - Removing the pinion seal 06:44 - Removing the pinion bearing races 06:51 - knowling 07:14 - Removing all of the smelly oil 07:23 - Shot blasting 07:53 - Removing rust the blaster missed 09:09 - Rust converting the main case 09:37 - Masking for paint 10:42 - Etching primer 11:03 - High build primer 11:19 - Basecoats 11:39 - Quartz crystal clear 12:07 - Curing the paint with the infrared lamp 12:13 - All of the new and restored parts 12:40 - Installing the pinion bearing races 13:06 - Installing the pinion shaft 13:24 - Installing the pinion seal 13:32 - Installing the drive flange 13:41 - Testing the preload and making adjustments 13:54 - Seating the pinion nut 14:02 - Installing the side bearings 14:18 - Installing the differential into the case 14:32 - Installing the side bearing races 14:58 - Testing the backlash 15:19 - Installing the side seals 15:28 - Electroplating the drain and fill plugs 16:22 - Installing the rear case 17:05 - Installing the fill plug 17:20 - Installing the drain plug 17:33 - Installing the mounting threads 17:56 - Installing the oil breather pipe 18:08 - Final shots 18:50 - Whats next & Thanks Tools & equipment used: Quartz Lacquer - https://goo.gl/8PTVKM Base Coat Paint - https://goo.gl/mWhufG Rust Remover - https://goo.gl/13gopW Rohr 250 Welder - https://bit.ly/33mkOGP U-Pol Weld Through Primer #2 - https://bit.ly/2qL38ak Fast Mover 1kW Infrared Paint Dryer, Stand, Timer - https://bit.ly/2WYR9jJ Workbenches - https://arborgardensolutions.co.uk Moldex Full Face Mask - https://goo.gl/NNYGrv FGL 5 Spray gun - https://goo.gl/Acg5rd A.N.I. R150-T Mini Spray gun - https://goo.gl/cHTJS2 Colad Washable Overalls - https://goo.gl/3Css9E Colad Mixing Cups - https://goo.gl/8DYmE8 Colad TurboMix Sticks - https://goo.gl/cYZfks Colad Synthetic Paint Strainers - https://goo.gl/H79ZgL Steel wire bits - http://geni.us/keyaD Blasting Cabinet - https://bit.ly/2GxvKJ7 Blasting pot - https://bit.ly/32TMnrU Cordless Ratchet - https://bit.ly/30YNlkG Parts Washer - https://bit.ly/2K5G9wA Rotary Tool - http://geni.us/HGed Concentrate Degreaser - http://geni.us/yUn9 Mannesmann Socket Set - http://geni.us/HCDZ Follow me on Social media to keep up to date with videos and behind the scenes. My Patreon Page: / restoreit My Twitter Page: / restore__it My Facebook Page: / restoreitchannel My Instagram Page: @RestoreItChannel PayPal Donations: [email protected] Discord I now also have a discord server if you want to chill with like-minded people and maybe learn something new: / discord
Comments