–°–∫–∞—á–∞—Ç—å —Å —é—Ç—É–± Making MOON lamp | DIY moon 3D textured wall art –≤ —Ö–æ—Ä–æ—à–µ–º –∫–∞—á–µ—Å—Ç–≤–µ
Making MOON lamp | DIY moon 3D textured wall art
1 –≥–æ–¥ –Ω–∞–∑–∞–¥
DIY
moon lamp
3D wall art
circular canvas
round canvas
moon wall art
DIY moon
lunar craters
moon texture artwork
textured wall art
3D art idea
night lamp
fairy string lights
spackling paste
wall art with spackling paste
structure paste
celestial
planatary
space
stellar
astronautic
Diy arts and crafts
DIY room decor
DIY gift idea
crafts with spackling paste leftovers
3D moon DIY
–ò–∑-–∑–∞ –ø–µ—Ä–∏–æ–¥–∏—á–µ—Å–∫–æ–π –±–ª–æ–∫–∏—Ä–æ–≤–∫–∏ –Ω–∞—à–µ–≥–æ —Å–∞–π—Ç–∞ –Ý–ö–ù —Å–µ—Ä–≤–∏—Å–∞–º–∏, –ø—Ä–æ—Å–∏–º –≤–æ—Å–ø–æ–ª—å–∑–æ–≤–∞—Ç—å—Å—è —Ä–µ–∑–µ—Ä–≤–Ω—ã–º –∞–¥—Ä–µ—Å–æ–º:
–ó–∞–≥—Ä—É–∑–∏—Ç—å —á–µ—Ä–µ–∑ dTub.ru –ó–∞–≥—Ä—É–∑–∏—Ç—å —á–µ—Ä–µ–∑ ClipSaver.ru–°–∫–∞—á–∞—Ç—å –±–µ—Å–ø–ª–∞—Ç–Ω–æ Making MOON lamp | DIY moon 3D textured wall art –≤ –∫–∞—á–µ—Å—Ç–≤–µ 4–∫ (2–∫ / 1080p)
–£ –Ω–∞—Å –≤—ã –º–æ–∂–µ—Ç–µ –ø–æ—Å–º–æ—Ç—Ä–µ—Ç—å –±–µ—Å–ø–ª–∞—Ç–Ω–æ Making MOON lamp | DIY moon 3D textured wall art –∏–ª–∏ —Å–∫–∞—á–∞—Ç—å –≤ –º–∞–∫—Å–∏–º–∞–ª—å–Ω–æ–º –¥–æ—Å—Ç—É–ø–Ω–æ–º –∫–∞—á–µ—Å—Ç–≤–µ, –∫–æ—Ç–æ—Ä–æ–µ –±—ã–ª–æ –∑–∞–≥—Ä—É–∂–µ–Ω–æ –Ω–∞ —é—Ç—É–±. –î–ª—è —Å–∫–∞—á–∏–≤–∞–Ω–∏—è –≤—ã–±–µ—Ä–∏—Ç–µ –≤–∞—Ä–∏–∞–Ω—Ç –∏–∑ —Ñ–æ—Ä–º—ã –Ω–∏–∂–µ:
–ó–∞–≥—Ä—É–∑–∏—Ç—å –º—É–∑—ã–∫—É / —Ä–∏–Ω–≥—Ç–æ–Ω Making MOON lamp | DIY moon 3D textured wall art –≤ —Ñ–æ—Ä–º–∞—Ç–µ MP3:
–Ý–æ–±–æ—Ç–∞–º –Ω–µ –¥–æ—Å—Ç—É–ø–Ω–æ —Å–∫–∞—á–∏–≤–∞–Ω–∏–µ —Ñ–∞–π–ª–æ–≤. –ï—Å–ª–∏ –≤—ã —Å—á–∏—Ç–∞–µ—Ç–µ —á—Ç–æ —ç—Ç–æ –æ—à–∏–±–æ—á–Ω–æ–µ —Å–æ–æ–±—â–µ–Ω–∏–µ - –ø–æ–ø—Ä–æ–±—É–π—Ç–µ –∑–∞–π—Ç–∏ –Ω–∞ —Å–∞–π—Ç —á–µ—Ä–µ–∑ –±—Ä–∞—É–∑–µ—Ä google chrome –∏–ª–∏ mozilla firefox. –ï—Å–ª–∏ —Å–æ–æ–±—â–µ–Ω–∏–µ –Ω–µ –∏—Å—á–µ–∑–∞–µ—Ç - –Ω–∞–ø–∏—à–∏—Ç–µ –æ –ø—Ä–æ–±–ª–µ–º–µ –≤ –æ–±—Ä–∞—Ç–Ω—É—é —Å–≤—è–∑—å. –°–ø–∞—Å–∏–±–æ.
–ï—Å–ª–∏ –∫–Ω–æ–ø–∫–∏ —Å–∫–∞—á–∏–≤–∞–Ω–∏—è –Ω–µ
–∑–∞–≥—Ä—É–∑–∏–ª–∏—Å—å
–ù–ê–ñ–ú–ò–¢–ï –ó–î–ï–°–¨ –∏–ª–∏ –æ–±–Ω–æ–≤–∏—Ç–µ —Å—Ç—Ä–∞–Ω–∏—Ü—É
–ï—Å–ª–∏ –≤–æ–∑–Ω–∏–∫–∞—é—Ç –ø—Ä–æ–±–ª–µ–º—ã —Å–æ —Å–∫–∞—á–∏–≤–∞–Ω–∏–µ–º, –ø–æ–∂–∞–ª—É–π—Å—Ç–∞ –Ω–∞–ø–∏—à–∏—Ç–µ –≤ –ø–æ–¥–¥–µ—Ä–∂–∫—É –ø–æ –∞–¥—Ä–µ—Å—É –≤–Ω–∏–∑—É
—Å—Ç—Ä–∞–Ω–∏—Ü—ã.
–°–ø–∞—Å–∏–±–æ –∑–∞ –∏—Å–ø–æ–ª—å–∑–æ–≤–∞–Ω–∏–µ —Å–µ—Ä–≤–∏—Å–∞ savevideohd.ru
Making MOON lamp | DIY moon 3D textured wall art
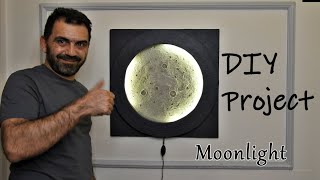
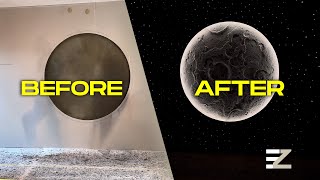
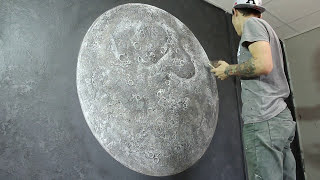
BLOG post with more information and pictures https://ramintaart.com/blogs/diy-wall... Hello, In this video, I'm making a moon lamp/ 3D textured wall art.üåö Actually, I made it last year. It was a Christmas present for a family member who wanted this exact art. I made this moon for the first time, and on my journey of making it, I've learned what could be improved for the next time üòÉ I used round canvas from the store. That paste is spackling paste. It is used in thin layers on the walls. However, this art requires quite a lot, especially in the middle, since it needs to be the highest point. I even used up old paste for the texture. This paste is heavy, too. So I've put cardboard underneath that canvas to make it pop outside and to help hold the shape and use less paste at the same time. First, I just spread all around the canvas, added old paste, and tried to make it rounded in the middle. Then, I started to make various size craters and texture. But as you see at 0:52 the bottle just stuck in the paste. After that, I started to dip my objects in the water first and then on the canvas. It helped, but if I'll make it the second time, after shaping into round form, I would wait maybe 2 hours for the surface to dry a bit. Then start to shape lunar craters like at 3:36 it is still soft and flexible inside but the outside is dry and doesn't stick to the objects. I also used cardboard in the middle to help hold the shape and use less paste. After I was done with shaping, canvas was left to dry. It took maybe around a week to dry completely. Half of the time it laid on my bathroom heating floor. It had a lot of moisture to evaporate. When drying it cracked in the middle. I was expecting that, but haven't had any paste left so I used structure paste to cover imperfections. Then painted all with acrylic paint. The paint color I mixed myself. I tried to match spackling paste color as close as I could. If I did it the second time I would just cover imperfections with spackling paste and leave it as that. No paint. I really liked texture and color of that paste. Then I made a frame from cardboard. Glued wiping paper all around. Painted inside white and outside in the same color as moon. Glued string lights with batteries and that's it. Materials: Circular canvas board, spackling paste/wall putty, spatula, hot glue, string lights, cardboard, acrylic paint, various round objects, wiping paper, school glue, water, paint brushes. All links https://RamintaArt.contactin.bio üé®MY ART SHOPS: ETSY https://ramintaartdesign.etsy.com Website https://ramintaart.com/ Society 6 https://bit.ly/3lDz7kx Redbubble http://RamintaArt.redbubble.com/ Fine art America https://fineartamerica.com/profiles/r... Zazzle https://www.zazzle.com/store/ramintaart AMAZON shop https://www.amazon.com/shop/rs.artcra... Craft tools on AMAZON https://amzn.to/3slC6X5 Acrylic paint on AMAZON: https://amzn.to/3FPPNQZ Spackling paste on AMAZON: https://amzn.to/49fYMrH Fairy string lights on AMAZON https://amzn.to/3wglilH (As an Amazon Associate I earn from qualifying purchases) ‚Äì‚Äì‚Äì‚Äì‚Äì‚Äì‚Äì‚Äì‚Äì‚Äì‚Äì‚Äì‚Äì‚Äì‚Äì‚Äì‚Äì‚Äì‚Äì‚Äì‚Äì‚Äì‚Äì‚Äì‚Äì‚Äì‚Äì‚Äì‚Äì‚Äì My social: INSTAGRAM: ¬Ý¬Ý/¬Ýraminta.art¬Ý¬Ý FACEBOOK: ¬Ý¬Ý/¬Ýrs.art.crafts.design¬Ý¬Ý TIK TOK: ¬Ý¬Ý/¬Ýraminta_art¬Ý¬Ý PINTEREST https://www.pinterest.se/ramintaartde... DEVIANT ART https://www.deviantart.com/ramintaart ‚Äì‚Äì‚Äì‚Äì‚Äì‚Äì‚Äì‚Äì‚Äì‚Äì‚Äì‚Äì‚Äì‚Äì‚Äì‚Äì‚Äì‚Äì‚Äì‚Äì‚Äì‚Äì‚Äì‚Äì‚Äì‚Äì‚Äì‚Äì‚Äì‚Äì
Comments