Скачать с ютуб Using and fitting an Off-Axis-Guider в хорошем качестве
Using and fitting an Off-Axis-Guider
4 года назад
Из-за периодической блокировки нашего сайта РКН сервисами, просим воспользоваться резервным адресом:
Загрузить через dTub.ru Загрузить через ClipSaver.ruСкачать бесплатно Using and fitting an Off-Axis-Guider в качестве 4к (2к / 1080p)
У нас вы можете посмотреть бесплатно Using and fitting an Off-Axis-Guider или скачать в максимальном доступном качестве, которое было загружено на ютуб. Для скачивания выберите вариант из формы ниже:
Загрузить музыку / рингтон Using and fitting an Off-Axis-Guider в формате MP3:
Роботам не доступно скачивание файлов. Если вы считаете что это ошибочное сообщение - попробуйте зайти на сайт через браузер google chrome или mozilla firefox. Если сообщение не исчезает - напишите о проблеме в обратную связь. Спасибо.
Если кнопки скачивания не
загрузились
НАЖМИТЕ ЗДЕСЬ или обновите страницу
Если возникают проблемы со скачиванием, пожалуйста напишите в поддержку по адресу внизу
страницы.
Спасибо за использование сервиса savevideohd.ru
Using and fitting an Off-Axis-Guider
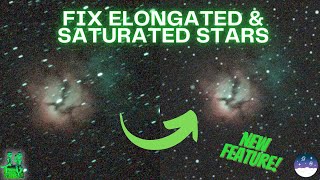
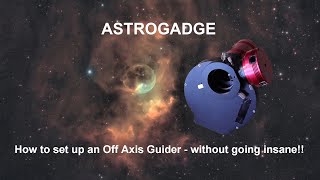
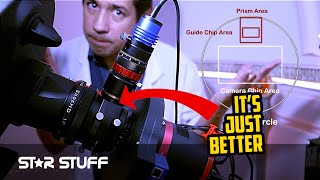
How to set-up and use an Off-Axis-Guider. Probably the best piece of kit I've bought for my telescope! In this video I explain why I've moved from a guide telescope to an Off-Axis-Guider, I show how I fitted it so that everything is in focus and show the results of my first images. If like me you have had problems guiding but you can’t identify any problems with the guiding stats then the problem might be flexure between your guide set-up and the main imaging telescope. My guiding is generally ok, but I have had nights when the telescope, in certain positions, simply fails, by this I mean the guide stats show really good guiding, but the main telescope shows trailed stars. The most likely cause of this is flexure between the guide telescope and the imaging telescope. So in this video I tackle this problem by fitting an Off Axis Guider (OAG), this is a small piece of kit that uses a prism to divert some of the light from the telescope imaging train to a guide camera. This ensures that the imaging camera and guide camera are always aligned because they are using the same optics, thus minimising flexure problems between the two systems. Two criticisms I’ve heard about OAG’s 1. They are hard to set-up 2. It can be difficult to find a star. Set-up: I didn’t find any issues at all, the key is to be methodical, the video below takes you through how I did this. Finding a guide star: I’ve used the OAG for 3 nights now (~21Hrs of imaging a dozen objects) and so far I’ve always had multiple stars to choose from, I generally guide with 5s exposures but experimented with shorter exposures and was still able to find stars, that said, I need more experience with the OAG to completely conclude this isn’t a problem, but I’d like to offer a possible reason for this criticism, back in the early days of CCD the sensors were tiny and the guide cameras even smaller, they were also very inefficient, However modern guide cameras are efficient and much larger – my guide camera is a QHY5L II – this has a sensor that is 4.8mm x 3.6mm, giving a field of view of on a 1000mm focal length telescope of 16′ x 12′ (about half the size of the full moon) and a quantum efficiency of 74% (for 100 photons hitting the sensor 74 electrons are produced) . UPDATE: I've not got rid of the guide scope, I've never not been able to find multiple guide stars even in poor conditions. The full guide on how to set-up an Off-Axis Guider is in the video The OAG was purchased with my own money from first light optics. My images are taken in Bortle 8 skies, in outer London, the bright constellations can be seen on a good night but fainter constellations such as Ursa Minor cannot be seen (except Polaris). Feel free to comment, like and subscribe. #Astronomy #AstronomyGear #ObservatoryRamblings
Comments


![All About Off-Axis Guiders [TAIC Short]](https://i.ytimg.com/vi/PrgO2IvRhmA/mqdefault.jpg)