Скачать с ютуб Scenic Projections and their Ideal Environment в хорошем качестве
Scenic Projections and their Ideal Environment
4 года назад
Скачать бесплатно Scenic Projections and their Ideal Environment в качестве 4к (2к / 1080p)
У нас вы можете посмотреть бесплатно Scenic Projections and their Ideal Environment или скачать в максимальном доступном качестве, которое было загружено на ютуб. Для скачивания выберите вариант из формы ниже:
Загрузить музыку / рингтон Scenic Projections and their Ideal Environment в формате MP3:
Если кнопки скачивания не
загрузились
НАЖМИТЕ ЗДЕСЬ или обновите страницу
Если возникают проблемы со скачиванием, пожалуйста напишите в поддержку по адресу внизу
страницы.
Спасибо за использование сервиса savevideohd.ru
Scenic Projections and their Ideal Environment
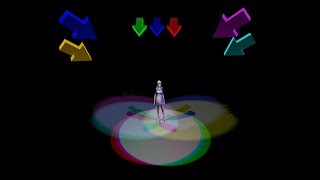
This video is intended to help individuals who are venturing into the use of scenic projections with modest experience in theatre technology. A complete transcript and additional resources are available at http://scenicandlighting.com/article/... Transcript: Hi. I’m Matt Kizer. In this brief tutorial, I’m going to provide tips on how to make the most out of projections on stage. Projections can add a lot of magic to any stage production. They seriously advance the story-telling with visuals. Compared to scenery that is built out of wood and paint, they can save a lot of time, and a lot of money. They are not completely magical, though. They need a little bit of care and they need the right environment. The biggest threat to your projections is the stage lights. When you first turn on your projector and connect it to a computer, and your stage is dark, your projections will look amazing. On a dark, black stage, you are seeing your projections at their very very best. We want to stay as close to that level of magic as we can. When any kind of direct or ambient light hits the image, it loses contrast. The blacks get filled in with light, and they’re not so black any more. The whites lose their contrast. Subtle colors like browns and darker reds disappear. Projectors and lighting instruments both shoot out light. Their brightness is measured in units called lumens. The thinner you spread this light, the dimmer it gets. Any single projector is usually dimmer than most heatrical lighting fixtures. Your stage lights can totally overwhelm your projected image and wash it out. No matter how bright your projector is, the stage lights will always be able to ruin it if you don’t use them with care. There are lots of things you can do to avoid washing out your projections. Depending on your space and on your equipment, you might not be able to do all of them. Just do what every theatre everywhere does: Do the best you can, with the time and the people and the resources that you have available. First, let’s look at the really obvious thing: How bright is your projector? Once upon a time, theatres used projectors that only put out maybe 300 lumens. I remember doing shows back when having 1000 lumens was a huge deal. We used a lot of tricks back then to make projections look good. In the year 2020, a normal classroom projector might range between 3000 and 4000 lumens. These can work just great on stage. I’ve used them many times. If you can get up into the 6000, 7000, or even 10,000 lumen range or higher, you’ll definitely have an easier time. The brighter ones are more expensive to rent or to own. Just get the best and the brightest unit that you can within reason. If you use a lot of the tips that I am going to describe here, you should be in great shape. Let’s get the most out of your equipment. The first thing that I recommend if it is at all possible is that you get some distance between your image and your performers. If your acting space goes right up to your projection screen, it can be hard to light the actors without also washing out the cyc. Try to have the set end in some way before it gets all the way back to the projection surface. This could be as simple as having the floor paint end in a no-actor zone a good six or eight feet from the cyclorama. Sometimes I’ll put a little wall on the floor at the bottom of the cyclorama. This lets me raise the image up a little higher above the floor. The wall could be simple black, or it could be part of the painted scenery. You could also include some space behind that wall before you get to the screen to protect the image even more. If it suits your show better, you could put a platform that goes all the way across the stage with space behind it. The second thing I recommend is that you minimize how brightly your floor will glow. No matter what you do, light is going to bounce off the floor. Some of that light will scatter upstage towards your image. If the floor is white, it will act like a light source. Darker colors, grays, and browns are usually better choices. And now, the most important thing: How are you lighting the stage? Too much front light can wash out projections, even with some distance between the actors and the image. What you need to do, as much as you can, is light the stage, as much as possible, using lighting from other directions apart from front light. First and foremost, sidelight is your friend. A great thing to do is to create low sidelight positions along both sides of the stage. An easy way to do this is to mount ellipsoidals to plywood squares called “floor mounts.” Ellipsoidals include Source Fours, Lekos, Altman 6x9s, 6x12s, and lots of other instruments. The important thing is that you use instruments that let you use shutter-cuts. For the complete transcript and additional resources. go to http://scenicandlighting.com/article/...
Comments