Скачать с ютуб How to make strawberry cheesecake | طرز تهیه چیز کیک یخچالی توت فرنگی بدون فر | چیز کیک با بیسکوییت в хорошем качестве
How to make strawberry cheesecake | طرز تهیه چیز کیک یخچالی توت فرنگی بدون فر | چیز کیک با بیسکوییت
2 года назад
چیز کیک
چیزکیک یخچالی
چیز کیک کافی شاپی
چیزکیک
چیز کیک توت فرنگی
طرز تهیه چیز کیک توت فرنگی
آموزش چیز کیک
آموزش چیز کیک یخچالی
چیز کیک توت فرنگی بدون فر
چیز کیک توت فرنگی با پتی بور
چیز کیک با بیسکویت پتی بور
چیز کیک با پایه کیک
چیز کیک ژله ای
طرز تهیه چیز کیک پنیری
چیز کیک یخچالی
کیک توت فرنگی
چیزکیک توت فرنگی
چیز کیک نیویورکی
Из-за периодической блокировки нашего сайта РКН сервисами, просим воспользоваться резервным адресом:
Загрузить через dTub.ru Загрузить через ycliper.com Загрузить через ClipSaver.ruСкачать бесплатно How to make strawberry cheesecake | طرز تهیه چیز کیک یخچالی توت فرنگی بدون فر | چیز کیک با بیسکوییت в качестве 4к (2к / 1080p)
У нас вы можете посмотреть бесплатно How to make strawberry cheesecake | طرز تهیه چیز کیک یخچالی توت فرنگی بدون فر | چیز کیک با بیسکوییت или скачать в максимальном доступном качестве, которое было загружено на ютуб. Для скачивания выберите вариант из формы ниже:
Загрузить музыку / рингтон How to make strawberry cheesecake | طرز تهیه چیز کیک یخچالی توت فرنگی بدون فر | چیز کیک با بیسکوییت в формате MP3:
Роботам не доступно скачивание файлов. Если вы считаете что это ошибочное сообщение - попробуйте зайти на сайт через браузер google chrome или mozilla firefox. Если сообщение не исчезает - напишите о проблеме в обратную связь. Спасибо.
Если кнопки скачивания не
загрузились
НАЖМИТЕ ЗДЕСЬ или обновите страницу
Если возникают проблемы со скачиванием, пожалуйста напишите в поддержку по адресу внизу
страницы.
Спасибо за использование сервиса savevideohd.ru
How to make strawberry cheesecake | طرز تهیه چیز کیک یخچالی توت فرنگی بدون فر | چیز کیک با بیسکوییت
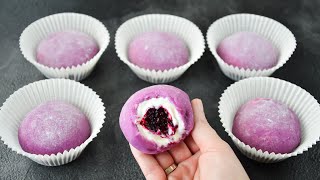
How to make strawberry cheesecake | طرز تهیه چیز کیک یخچالی توت فرنگی بدون فر چیز کیک با بیسکوییت @reyhan_style • How to make strawberry cheesecake | طرز ته... مواد لازم : لایه اول: بیسکوییت وانیلی ۱۰۰ گرم کره ذوب شده ۱۰۰ گرم لایه دوم: پنیر خامه ای ۴۰۰ گرم خامه صبحانه ۲۰۰ گرم پودر ژلاتین خالص فرمند ۳ ق غ آب سرد ۵ ق غ پودر قند ۳ ق غ لایه سوم : پودر دسر اکلیلی فرمند ۲ بسته آب جوش ۴ لیوان متوسط . طرز تهیه : برای لایه اول بیسکویت هارو پودر کرده و با کره ذوبشده مخلوط میکنیم. داخل قالب کمربندی با قطر ۲۰ مخلوط رو میریزیم و با پشت لیسک یا یک جسم سفت به خوبی فشرده میکنیم. و قالب رو کنار میزاریم. برای لایه پنیری دوم: پودر ژلاتین و اب سرد مخلوط میکنیم و روی بخار کتری بنماری میکنیم تا ذوب شود. پنیر خامه ای و خامه و پودر قند مخلوط میکنیم تا یکدست شود و به ارامی در حین هم زدن ژلاتین رو به مواد اضافه میکنیم. و مخلوط پنیری رو روی لایه اول میریزیم و برای یک ساعت داخل یخچال قرار میدهیم . برای لایه سوم: پودر دسر اکلیلی و دو لیوان آب جوش با هم مخلوط میکنیم و به خوبی هم میزنیم تا کاملا یکدست بشه . برای چند دقیقه کنار میزاریم تا خنک بشه و بعد روی لایه دوم میریزیم. برای ۲ ساعت داخل یخچال قرار میدهیم و بعد به سلیقه خودتون تزیین کنید. 🥰❤️ من برای تزیین از خامه ، توت فرنگی ، برگ نعنا و سس توت فرنگی استفاده کردم🥰🍓 #چیزکیک #چیزکیک_یخچالی #چیزکیک_خونگی #کیک #کیک_تولد #دسر #دسرخانگی #دسر_خانگی #فرمند #cheesecake #cheesecakes #cheese _____________________________________________ ingredients : First layer: Vanilla biscuit 100 grams 100 grams of melted butter Second layer: 400 grams of cream cheese Breakfast cream 200 grams Fermand pure gelatin powder 3 g Cold water 5 a.m Powdered sugar 3 g Third layer: Fermand wreath dessert powder 2 packs 4 medium glasses of boiling water . How to prepare: For the first layer, powder the biscuits and mix with melted butter. We pour the mixture into a 20-diameter belt mold and press it well with the back of a whisk or a hard object. And we put aside the mold. For the second cheese layer: Mix gelatin powder and cold water and put it on the steam of the kettle until it melts. Mix cream cheese, cream and powdered sugar until it is smooth and slowly add gelatin to the ingredients while stirring. And pour the cheese mixture on the first layer and put it in the refrigerator for an hour. For the third layer: Mix Akalili dessert powder and two glasses of boiling water together and mix well until it is completely uniform. Leave it aside for a few minutes to cool and then pour it on the second layer. Put it in the fridge for 2 hours and then decorate it according to your taste. ❤️ I decorate with cream, strawberries, mint leaves And I used strawberry sauce . #cheesecake #refrigerated_cheesecake #khongi_cheesecake #cake #birthday_cake #dessert #dessert #home_dessert #order #cheesecake #cheesecakes #cheese _____________________________________________ دوستای عزیزم با سابیکرایب و لایک کردن ویدیوهامون لطف بزرگی به مامیکنید و به ما انگیزه میدید تا ویدیو های آشپزی بیشتری توی کانالمون بذاریم.🥰😍🙏 مرسی که این ویدیو رو تماشا کردید 😍👇اگه هنوز سابسکرایب نکردی اینجارو بزن👇 / @reyhan_style _____________________________________________ 💡 Click the text [cc] on the top right of the video and the three dots on the top right and click TRANSLATE and YOU CAN ENABLE SUB-TITLES. ⚠️SUBSCRIBE and ACTIVATE THE NOTIFICATION BELL 🔔 so you don't miss new videos, and if you like the video, don't forget to leave a nice LIKE and share it with your friends. Thank you. _______________________________________ غذای گیاهی,غذای گیاهی ایرانی,غذای گیاهی خوشمزه,آموزش,آموزش آشپزی,آموزش آشپزی ایرانی,آموزش آشپزی حرفه ای,آموزش آشپزی افغانی,آموزش آشپزی ساده,آشپزی,آشپزی ایرانی,آشپزی ایرانی جدید,آشپزی آسان,cooking,recipe,persian cuisine,persian cuisine recipes,persian recipes,persian
Comments