Скачать с ютуб Roof Edge Sealing - Grand Design Imagine в хорошем качестве
Roof Edge Sealing - Grand Design Imagine
2 года назад
Из-за периодической блокировки нашего сайта РКН сервисами, просим воспользоваться резервным адресом:
Загрузить через dTub.ru Загрузить через ClipSaver.ruСкачать бесплатно Roof Edge Sealing - Grand Design Imagine в качестве 4к (2к / 1080p)
У нас вы можете посмотреть бесплатно Roof Edge Sealing - Grand Design Imagine или скачать в максимальном доступном качестве, которое было загружено на ютуб. Для скачивания выберите вариант из формы ниже:
Загрузить музыку / рингтон Roof Edge Sealing - Grand Design Imagine в формате MP3:
Роботам не доступно скачивание файлов. Если вы считаете что это ошибочное сообщение - попробуйте зайти на сайт через браузер google chrome или mozilla firefox. Если сообщение не исчезает - напишите о проблеме в обратную связь. Спасибо.
Если кнопки скачивания не
загрузились
НАЖМИТЕ ЗДЕСЬ или обновите страницу
Если возникают проблемы со скачиванием, пожалуйста напишите в поддержку по адресу внизу
страницы.
Спасибо за использование сервиса savevideohd.ru
Roof Edge Sealing - Grand Design Imagine
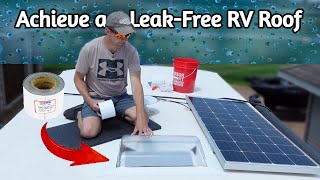
This how-to covers the process of properly sealing the roof edge with lap sealant. Video included. Materials: • (1) tube of Alpha Systems Non-sag Lap Sealant (I used ½ tube for 50+ feet) • 1” blue tape • Isopropyl alcohol • Caulking gun • Roof cleaning (i.e. Eternabond Roof Cleaner or isopropyl alcohol) • Rag for cleaning • Paper towels Tips: • Working with lap sealant is nothing like latex caulk or silicone, both of which can be easily shaped with a finger. Lap sealant is like marshmallow crème, very sticky and impossible to shape with a finger. • Use a very thin bead on the non-sag sealant. • Use a paper towel, and wet with alcohol to wipe the bead. Try to leave as little as possible on the tape but don’t wipe out the sealant application. • Let it cure for a minimum of 24 hours, 48+ would be even better. I tried pulling the tape an hour after application and the sealant was sticking badly to the tape. • After 24 hours the blue tape was falling off, which meant the lap sealant had cured enough to release the tape. • It stuck in a few areas but not bad. A 48-hour cure would be better. • Temperature may impact curing time, adjust accordingly.
Comments


![RV Roof Maintenance [HOW TO]: Dicor Self-Leveling Lap Sealant (Lap Seal)](https://i.ytimg.com/vi/vuR_hQ2MEuo/mqdefault.jpg)