Скачать с ютуб Fun Fold Shirt and Tie Card, Great Father's Day or B-Day Card в хорошем качестве
Fun Fold Shirt and Tie Card, Great Father's Day or B-Day Card
8 лет назад
Из-за периодической блокировки нашего сайта РКН сервисами, просим воспользоваться резервным адресом:
Загрузить через dTub.ru Загрузить через ClipSaver.ruСкачать бесплатно Fun Fold Shirt and Tie Card, Great Father's Day or B-Day Card в качестве 4к (2к / 1080p)
У нас вы можете посмотреть бесплатно Fun Fold Shirt and Tie Card, Great Father's Day or B-Day Card или скачать в максимальном доступном качестве, которое было загружено на ютуб. Для скачивания выберите вариант из формы ниже:
Загрузить музыку / рингтон Fun Fold Shirt and Tie Card, Great Father's Day or B-Day Card в формате MP3:
Роботам не доступно скачивание файлов. Если вы считаете что это ошибочное сообщение - попробуйте зайти на сайт через браузер google chrome или mozilla firefox. Если сообщение не исчезает - напишите о проблеме в обратную связь. Спасибо.
Если кнопки скачивания не
загрузились
НАЖМИТЕ ЗДЕСЬ или обновите страницу
Если возникают проблемы со скачиванием, пожалуйста напишите в поддержку по адресу внизу
страницы.
Спасибо за использование сервиса savevideohd.ru
Fun Fold Shirt and Tie Card, Great Father's Day or B-Day Card
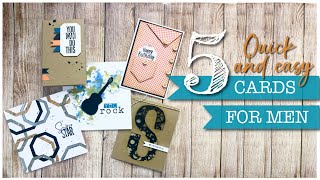
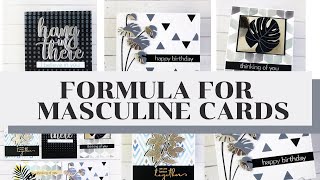
I saw Rajni's Craftivity make this card and wanted to try it for myself. I used a stamp set from TAC Trendy Greetings for my sentiments.. Start with and 8 1/2" x 11" piece of paper. Folding on the 11" length, you will want to put the pattern you like underneath (so if your paper is white on one side, start with the white side facing you.) Fold the paper in half on the 11" length; Then unfold it and fold your side into the center and fold it down making sure it's well burnished. Do the same to the other side. Now take a ruler and from the top of your page (with the opening on this side) go down 2" and make a line across. Take the top of the paper and fold it down to the 2" mark, so basically you are folding it on the 1" mark down to the 2". Now that you have your fold, take your ruler and on the 2" line you made, go in from each side 3/4" and make a little mark. You will cut the paper to that 3/4" mark on both sides then erase all your marks. Take the top right side and fold it toward the center so your inner point touches the center line. Do the same to the left side and this creates your collar. I struggled with the center of this paper and put a piece of tear tape near the top inside the collar so it doesn't wrinkle. Now take the bottom of your paper and fold it so that it lines up with the top under the collar and line it up so the edges match the top edges. Fold it and use your bone folder on that fold. Now open the card and from the center fold on the middle go down 3/4" from the center and make a mark with a pencil. Fold the bottom of the paper back from the mark you made so that the paper is folded all the way back to the bottom right corner. Do the same on the left side. Use the bone folder on the folds and erase your mark and fold it back under the collar and your sleeves are made. I took a 4 x 4" square white paper inside and attached it below the collar and just above the center fold so you have somewhere to write. I put my sentiment on a piece of cardstock and glued it to the white 4 x 4 paper. Then I decided to cover the pattern on the back that I don't like. If you choose your paper wisely, you won't have to do this step, but my paper on the reverse was weird. I laid a piece of paper that matched my front on to the part of the card that had the weird paper on it and traced it, then cut it out and glued it down. It really makes a finished look for the card. To make the tie, I took a piece of cardstock that I liked with my shirt pattern and made a strip that is 1" wide x 3 3/4" long and at the top at 1/2" make a mark. Then go down to 3/4" and draw a line across the whole 1". Then at the very bottom from each side, at 1/4" put a mark and draw a line from the bottom right 1/4" mark to the right edge of the line at 3/4" line. Then do the same on the left side. From the center mark at the top, draw a line to the right edge of the 3/4" line and also to the left side of the line, creatring a triangle. Now cut the triangle and down the sides making sure you are as straight as possible with your cutting. (Your tie is upside down) If you do your marking on the back of the paper, you won't have to erase your lines. Next, take a 1"tall x 1 1/2" wide matching cardstock and cut angled lines toward the center, making the base 3/4" wide and the top about 1" wide. This is the top of the tie. Center it on your long piece of tie and glue the two together. Don't put any glue on the top half of the knot of the tie then lay the tie down so it fits under the collar and lands just above the line on the inside of the collar. To make the pocket, take the paper you like best (on one card I used the same paper as the tie and on the other, I used the same paper as the shirt. Cut a piece that is 1 1/4" tall by 1" wide and trim the bottom edge so it has angles on it like a pocket would have, I eyeballed this. Glue it down by using tear tape and just taping under the edges so in case you would like to put a little note inside, you can. To glue down the collar, make sure you don't glue anywhere near the bottom half of the collar, and use tear tape or another strong glue to keep it down, always making sure you can open the card. You'll need to make your own envelope that is roughly 5 1/2" x 6". You can find ways to make your own envelope without any tools on this video. • DIY Six Different Ways to Make Envelopes Here is my contact information: Email: [email protected] Blog: craftingforalmosteveryone.com Instagram: crafting for almost everyone Pinterest: saundralparker Google+: crafting for almost everyone Facebook: crafting for almost everyone
Comments