Скачать с ютуб How to Make a Patio Cooler Ice Chest в хорошем качестве
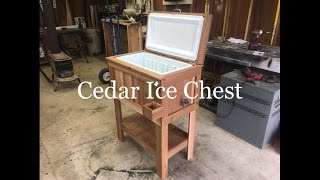
How to Make a Patio Cooler Ice Chest
9 лет назад
Скачать бесплатно How to Make a Patio Cooler Ice Chest в качестве 4к (2к / 1080p)
У нас вы можете посмотреть бесплатно How to Make a Patio Cooler Ice Chest или скачать в максимальном доступном качестве, которое было загружено на ютуб. Для скачивания выберите вариант из формы ниже:
Загрузить музыку / рингтон How to Make a Patio Cooler Ice Chest в формате MP3:
Если кнопки скачивания не
загрузились
НАЖМИТЕ ЗДЕСЬ или обновите страницу
Если возникают проблемы со скачиванием, пожалуйста напишите в поддержку по адресу внизу
страницы.
Спасибо за использование сервиса savevideohd.ru
How to Make a Patio Cooler Ice Chest
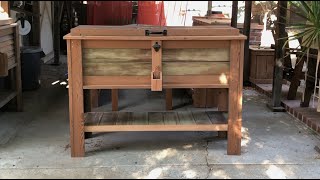
Plans Available here: https://academy.diypete.com/products/... Learn how to build a DIY Patio Cooler Cedar Ice Chest with DIYPETE. He'll show you all of the steps needed to build your own cedar ice chest. For more info, project photos, and downloadable plans check out: http://www.diypete.com/icechest - Legs are 33 1/2 inches. *Note that these are affiliate links, meaning that when you buy something that is recommended below, it helps support the Channel. Thanks in advance! *Tools Needed Kreg Jig - http://amzn.to/1X7Bd9H Power Drill - http://amzn.to/1OxMfnt Orbital Sander - http://amzn.to/1VUVNYy Table Saw - http://amzn.to/1X7Eje5 Nail Gun - http://amzn.to/1X7EVQU *Supplies Needed Wood Glue - http://amzn.to/1OxNqD7 Box of 2 1/2 inch Kreg Screws - http://amzn.to/1X7F0E0 Box of 1 1/4 inch nails - http://amzn.to/1LwlddE 4 inch Riser, 1/2 inch threaded Piping, 1/2 inch coupler, Red knob spigot/valve 2 1/2 inch or 2 inch locking caster wheels 52 Quart Igloo Contour Cooler (I found mine at Target for $29.00) 2 Hinges 3 Handles Start making your cuts for the legs of your cedar ice chest. I’d recommend using a miter saw. Remove hardware from the cooler. Assemble the legs. I used a Kreg Jig to drill 4 pocket holes in one board for each leg. Then connect using wood glue and 2 1/2 inch Kreg screws. Assemble the frame for the cooler out of 2×4 boards. Connect each 2×4 with 2 1/2 inch screws. You can make it as snug as you’d like. I left about a half inch of play on each side to make it easy to remove the cooler if needed. Use the cooler as a template or measure the cooler to determine how long to cut these boards. Attach the 4 corners to the top frame. Use 2 1/2 inch wood screws and put about 4 for each corner. Drill a pilot hole before putting the screws in so the wood doesn’t split. Add the apron. Rip fence boards on a table saw and then glue and nail them to the top as shown in the photo. This will create about a half inch overhang on each side. I cut the apron to 3 1/2 inches wide. Create the cooler support out of 2×4’s Place the frame upside down on a flat surface and slide the cooler in place. Next, put the support at the base of the cooler and attach to the legs using screws and pocket holes. If you don’t have a kreg jig, you could pre-drill and then run screws in at an angle. Add fence pickets around all sides to hide the cooler. I started by attaching a board in the middle of the sections and then moved to the left and right. Use as many full width fence boards as you can. Rip the outer boards on a table saw to get a perfect fit. I’d recommend spacing the boards roughly 1/8 to 1/4 of an inch from each other. Add trim horizontally on each side. Rip fence boards into 2 inch strips and then glue and nail the trim in place. Place the cooler in the frame and then mark where the hole will go through the side of the wood surround. Then drill a small hole through the wood from the inside. Next, use a larger bit or hole saw from the outside to finish the full sized hole. This is where the piping will go through. Determine the height and width of your cooler lid. Mine was a little less than 2 inches high and so I ripped a couple 2×4 boards to make them 2 inches tall. Then place the boards around the perimeter and cut to size. The lid should be snug with the wood. Attach the plastic cooler lid to the wood using 2 inch screws. Pre-drill and then put in the screw. Make sure the outer part of the lid is flush with the wood. The inner part will protrude from the wood because it is what will allow the cooler to stay in place when the lid goes down. The inner portion will seal the cooler. Cut 4 fence boards down to size and rip them each to the same width on the table saw. Leave about an 1/8 of an inch between each. Use glue and an air nailer to keep them in place. Facebook: / diyprojectswithpete Instagram: / diypete Pete Sveen 1627 W Main Street Suite 182 Bozeman, Montana 59715
Comments