Скачать с ютуб 2006 Toyota Sienna Thermostat Replacement в хорошем качестве
2006 Toyota Sienna Thermostat Replacement
1 год назад
Из-за периодической блокировки нашего сайта РКН сервисами, просим воспользоваться резервным адресом:
Загрузить через dTub.ru Загрузить через ClipSaver.ruСкачать бесплатно 2006 Toyota Sienna Thermostat Replacement в качестве 4к (2к / 1080p)
У нас вы можете посмотреть бесплатно 2006 Toyota Sienna Thermostat Replacement или скачать в максимальном доступном качестве, которое было загружено на ютуб. Для скачивания выберите вариант из формы ниже:
Загрузить музыку / рингтон 2006 Toyota Sienna Thermostat Replacement в формате MP3:
Роботам не доступно скачивание файлов. Если вы считаете что это ошибочное сообщение - попробуйте зайти на сайт через браузер google chrome или mozilla firefox. Если сообщение не исчезает - напишите о проблеме в обратную связь. Спасибо.
Если кнопки скачивания не
загрузились
НАЖМИТЕ ЗДЕСЬ или обновите страницу
Если возникают проблемы со скачиванием, пожалуйста напишите в поддержку по адресу внизу
страницы.
Спасибо за использование сервиса savevideohd.ru
2006 Toyota Sienna Thermostat Replacement
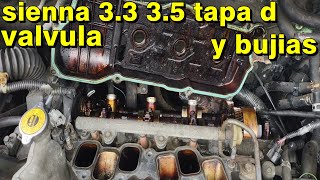
Thermostat (Toyota 90916-A3003) - https://amzn.to/3MGwmhy Gasket (FEL-PRO 35445) - https://amzn.to/3MI8Sst Plastic Coolant Inlet (Toyota 16321-0A040) - https://amzn.to/3FZCMVk Engine Air Filter (Denso 143-3003) - https://amzn.to/47tEjP5 Tools Needed: Socket with 10mm, 12mm, and extension Flat-bladed screwdriver Phillips Screwdriver Torque Specifications: • 10mm Nuts: 14 ft-lbs (168 in-lbs) In this video we guide you through the process of replacing the thermostat in a 2006 Toyota Sienna equipped with the 3.3 Liter V6 engine. If you've been experiencing error codes like P0128 or P0126 related to coolant temperature, this video should help you. These codes could be clear indicators of a faulty thermostat. Steps Covered in this Video: 00:00 - Introduction 00:22 - Removing the engine air filter housing 01:53 - Disassemble the coolant inlet pipe 02:55 - Remove the faulty thermostat 03:12 - Install the new thermostat 03:23 - Reassemble all components in reverse order 05:39 - Top off the radiator with coolant If you found this video helpful, please show your support by giving it a thumbs up and subscribing to our channel. Your support means the world to us, and it motivates us to create more informative content to help you with your automotive projects. Until the next DIY adventure, happy wrenching, and thanks for tuning in to PracticalMechanic.com! For more helpful tutorials, visit: PracticalMechanic.com I may earn commissions for purchases made through the links. As an Amazon Associate, I earn from qualifying purchases.
Comments